
Installation and Maintenance Guide
1. Safety Information
Safe operation of this product can only be guaranteed if it is properly installed, commissioned, and maintained by qualified personnel in compliance with the operating instructions (see Section 1.11). General installation and safety instructions for pipeline and plant construction must also be followed, and tools and safety equipment must be used correctly.
1.1 Intended Use
Refer to the Installation and Maintenance Guide, nameplate, and technical documentation to ensure that the product is suitable for its intended use. The product listed in the table below fully complies with the European Pressure Equipment Directive 97/23/EC and ATEX Directive 94/9/EC. The CE and ® marks are available where required. Its Pressure Equipment Directive classification is as follows:
| Product | Group 1 Gases | Group 2 Gases | Group 1 Liquids | Group 2 Liquids |
|---|---|---|---|---|
| APT10 | - | SEP | - | SEP |
The product is marked in accordance with ATEX Directive 94/9/EC II 2G C T3.
I) The product is designed for use with Group 2 fluids under the Pressure Equipment Directive, including steam, air, and water/condensate. Consult Spirax Sarco regarding use with other fluids. II) Ensure that the product materials are suitable for the operating conditions and that the maximum and minimum system pressures and temperatures are within the product design limits. If the product’s maximum operating limits are lower than the system operating conditions, or if product failure could result in overpressure or excessive temperature, install a safety device to prevent hazardous conditions. III) Ensure that the product is installed correctly and that the inlet and outlet connections are not reversed. IV) Spirax Sarco products are not designed to withstand external loads. The installer must prevent external forces from the system from acting on the product. V) Remove the protective covers from all product connections before installation.
1.2 Access
Ensure adequate access and working space after installation. If necessary, provide a suitable working platform before operating the product. Provide lifting equipment where required.
1.3 Lighting
Ensure adequate lighting, particularly where detailed or complex work is required.
1.4 Hazardous Liquids or Gases in the Pipeline
Consider in advance what is in the pipeline or what may have been in it. Beware of flammable substances, substances hazardous to health, and substances at extreme temperatures.
1.5 Hazardous Working Environment
Consider explosion risks, oxygen deficiency (for example, inside tanks or in low-lying areas), hazardous gases, extreme temperatures, hot surfaces, fire hazards (for example, during welding), excessive noise, and moving machinery.
1.6 The System
Understand how the complete system operates. Before taking any action, such as closing isolation valves or switching off electrical equipment, consider whether it could place any other part of the system or any personnel at risk.
Hazards may include the isolation of vents or protective devices and the disabling of controls or alarms. Open and close isolation valves slowly to prevent system shock.
1.7 Pressure Systems
Ensure that all pressure is isolated and safely vented to atmospheric pressure. Consider double isolation and bleed, and lock or label closed valves. Never assume that the system is completely depressurized merely because the pressure gauge reads zero.
1.8 Temperature
After isolation, allow the product to cool to room temperature to prevent burns.
1.9 Tools and Spare Parts
Before starting work, ensure that suitable tools and spare parts are available. Use only genuine Spirax Sarco spare parts.
1.10 Protective Clothing
Consider whether operators or nearby personnel require protective clothing to guard against hazards such as chemicals, extreme temperatures, radiation, noise, falling objects, and injuries to the eyes and face.
1.11 Permit to Work
All work must be performed or supervised by a suitably competent person. Installation and operating personnel must be trained in accordance with the product’s Installation and Maintenance Guide to ensure correct use of the product.
Where a formal permit-to-work system is in place, it must be followed. Where no such system is in place, the person responsible must understand the nature of the work and, where necessary, appoint an assistant with specific responsibility for safety.
Post warning notices where necessary.
1.12 Handling
Manual handling of large or heavy products may present a risk of injury. Lifting, pushing, pulling, carrying, or supporting heavy loads by physical effort can cause injury, particularly to the back. Assess the task, the individual, the load, and the working environment, and use appropriate handling methods according to site conditions.
1.13 Residual Heat
During normal use, the external surface of the product may become very hot. When operated at the maximum permissible operating temperature, the surface temperature may reach 200°C (392°F).
This product is not self-draining. Exercise caution when removing or relocating it from its installed position (refer to the “Maintenance Instructions”).
1.14 Freezing
Non-self-draining products used where the ambient temperature may fall below freezing must be protected against frost.
1.15 Safety Information - Product-Specific Information
For information on the product weight and internal mechanism, refer to the relevant sections of the Installation and Maintenance Guide.
1.16 Disposal
Unless otherwise stated in the Installation and Maintenance Guide, this product is recyclable and presents no ecological hazard when disposed of properly.
1.17 Returning Products
In accordance with EC health, safety, and environmental legislation, customers and stockists returning products must provide information on any hazards and the precautions to be taken due to residual contamination or mechanical damage that may present a health, safety, or environmental risk. This information must be provided in writing, including health and safety data sheets identifying any known or potential hazards.
2. Product Information
2.1 Introduction
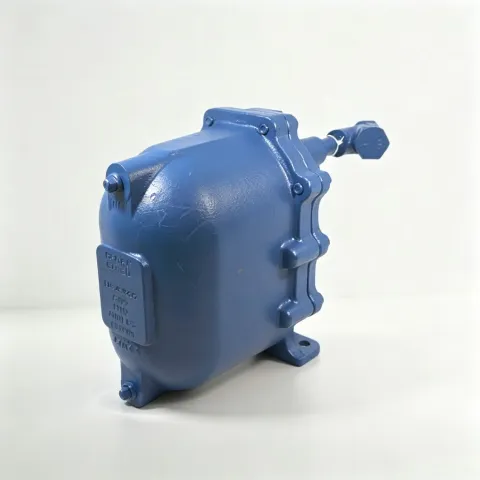
The Spirax Sarco APT10-4.5 Automatic Pump Trap has a design rating of PN10 and is available with either the standard blue-painted finish or an ENP coating (electroless nickel plating). Depending on pipeline operating conditions, the unit automatically switches between trapping and pumping modes. It is steam-operated and removes condensate from equipment under all operating conditions, including vacuum.
2.2 Sizes and Pipe Connections
| Connection | Size | Thread Standard |
|---|---|---|
| Liquid inlet | DN20 (3/4”) | BSP, BS 21 parallel thread |
| Liquid inlet | DN20 (3/4”) | NPT |
| Liquid outlet | DN20 (3/4”) | BSP |
| Liquid outlet | DN20 (3/4”) | NPT |
| Motive steam/exhaust | DN15 (1/2”) | BSP |
| Motive steam/exhaust | DN15 (1/2”) | NPT |
2.3 Limiting Conditions
| Item | Value | Notes |
|---|---|---|
| Body design conditions | PN10 | |
| Maximum motive steam conditions | 4.5 bar g | (65 psi g) |
| Maximum operating pressure | 4.5 bar g | (65 psi g) |
| Maximum operating back pressure | 4.0 bar g | (58 psi g) |
| Maximum operating temperature | 155°C | (311°F) |
| Minimum operating temperature | -10°C | (14°F) |
| Ambient temperature limits | -10°C to 200°C | (14°F to 392°F) |
| Design cold hydrostatic test pressure | 15.0 bar g | (217 psi g) |
| Minimum installation head from pump base | 0.2 m | (8”) |
| Recommended installation head from pump base | 0.3 m | (12”) |
2.4 Rated Capacity
Contact Spirax Sarco for the capacity applicable to a specific installation.
The following information is required to select the correct automatic pump trap:
- Available installation head (m): the vertical distance from the base of the automatic pump trap to the centerline of the condensate outlet from the heat exchanger or process equipment. If the outlet points vertically downward, use the distance from the pump trap base to the outlet face of the heat exchanger or process equipment.
- Available motive steam pressure (bar g).
- Total back pressure in the condensate return line (bar g). See the note below.
- Operating pressure of the heat exchanger at full load (bar g).
- Maximum steam load of the heat exchanger (kg/h).
- Minimum inlet temperature of the heated medium (°C).
- Maximum controlled temperature of the heated medium (°C).
| Size | DN20 x DN20 |
|---|---|
| Pump displacement per cycle | 2.1 L |
| 1.0 m installation head + 4.5 bar g (65 psi) motive steam | Maximum trapping-mode capacity: 830 kg/h |
| 2.5 bar g (36.2 psi) back pressure | Maximum pumping-mode capacity: 650 kg/h |
Note: To achieve the rated capacity, the total lift or back pressure BP on the automatic pump trap, comprising the static head plus the pressure in the condensate line, must be lower than the motive steam pressure. BP (back pressure) = (H x 0.0981) + (P) + (Pf)
Where: height (H) in m x 0.0981 + pressure in the condensate line (P) in bar g + downstream pipe friction loss (Pf) in bar. (The pipe friction loss Pf may be disregarded if the downstream pipeline is less than 100 m long, the condensate line does not run full, and the effect of flash steam at the maximum operating load of the heat exchanger has been considered when sizing the pipeline.)
2.5 Ordering
Example: 1 Spirax Sarco APT10-4.5 Automatic Pump Trap, DN20 x DN20 BSP threaded connections, with a BSP motive steam connection.
2.6 Dimensions/Weight (Approximate), mm and kg
| Size | A | B | C | D | E | F | G | H | I | Weight |
|---|---|---|---|---|---|---|---|---|---|---|
| DN20 x DN20 | 187 | 23 | 223 | 398 | 273 | 220 | 57 | 135 | 171 | 14 |
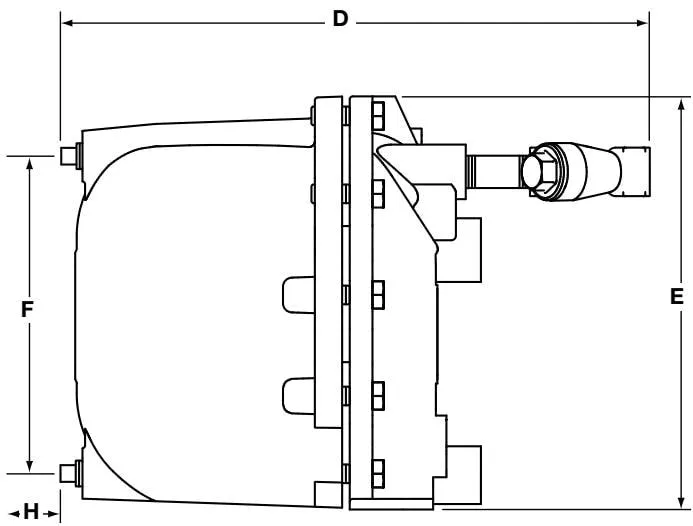
Figure 1
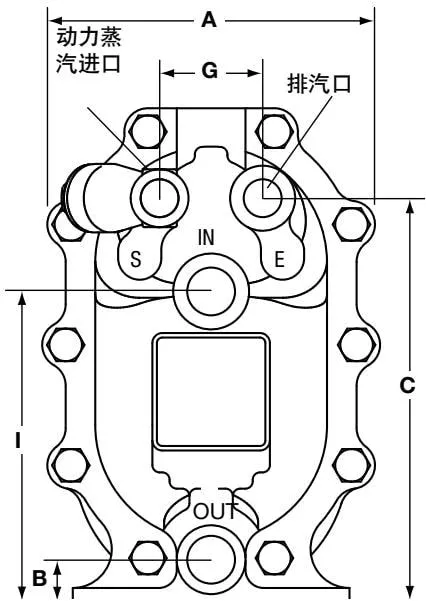
Figure 2
2.7 Materials
| Part No. | Part | Material | Material Standard |
|---|---|---|---|
| 1 | Pump cover | Ductile iron | EN JS 1025/ASTM A395 |
| 2 | Pump cover gasket | Stainless steel-reinforced graphite | |
| 3 | Pump body | Ductile iron | EN JS 1025/ASTM A395 |
| 4 | Pump cover bolts | Stainless steel | BS EN ISO 3506 Gr. A2 70 |
| 5 | Pump valve linkage | Stainless steel | BS 1449 304 S15 |
| 6 | Float | Stainless steel | BS 1449 304 S16 |
| 7 | Pivot pin | Stainless steel | BS 970 431 S29 / ASTM A276 431 |
| 8 | Gasket | Stainless steel | BS 1449 316 |
| 9 | Trap chamber | Stainless steel | BS 970 431 S29 / ASTM A276 431 |
| 10 | Ball | Stainless steel | ASTM A276 440 B |
| 11 | Seat (inlet check valve) | Stainless steel | AISI 420 |
| 12 | Flap (inlet check valve) | Stainless steel | BS 3146 ANC 4B |
| 13 | Pump mechanism bracket | Stainless steel | BS 3146 ANC 4B |
| 14 | Spring (pump) | Stainless steel | BS 2056 302 S26 Gr. 2 |
| 15 | Split pin | Stainless steel | BS 1574 |
| 16 | Exhaust valve | Stainless steel | BS 970 431S29 / ASTM A276 431 |
| 17 | Motive inlet valve and seat assembly | Stainless steel | |
| 18 | Exhaust valve | Stainless steel | BS 3146 ANC 2 |
| 19 | Valve seat gasket | Stainless steel | BS 1449 409 S19 |
| 20 | Pump mechanism bolts | Stainless steel | BS EN ISO 3506 Gr. A2-70 |
| 21 | Float bolt | Stainless steel | BS EN ISO 3506 Gr. A2-70 |
| 22 | First-stage trap | Stainless steel | BS 970 431 S29 / ASTM A276 431 |
| 23 | Trap gasket | Stainless steel | BS 1449 409 S19 |
| 24 | Push rod | Stainless steel | BS 3146 ANC 2 |
| 25 | Nameplate | Stainless steel | BS 1449 304 S16 |
| 26 | Drain plug | Stainless steel | DIN 17440 1.4571 |
| 27 | Motive steam strainer | Ductile iron |
2.8 Disposal
This product does not contain hazardous materials.
When disposing of the product, give due consideration to recycling and environmental protection.
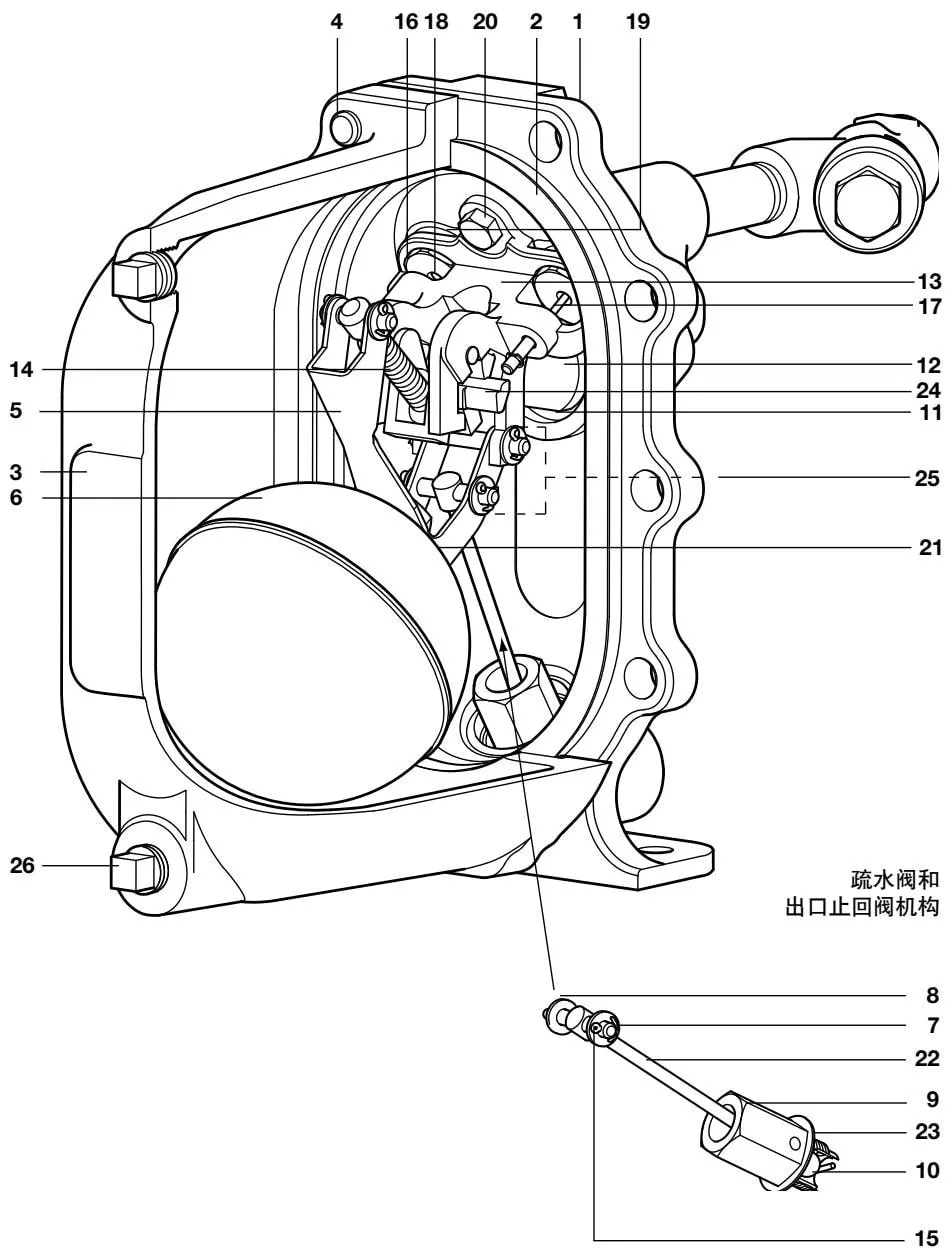
Figure 3
3. Installation
Important - Safety Notice
Before carrying out any installation or maintenance work, ensure that all steam and condensate lines are isolated.
Ensure that all residual pressure within the product or connected pipework has been fully relieved and that all hot components have cooled to prevent burns. Wear suitable protective clothing before carrying out any installation or maintenance work. Use appropriate lifting equipment and ensure that the product is securely supported.
Note: If the pumped medium presents an explosion hazard, the motive gas must be inert and non-oxidizing.
3.1 Inlet Pipework
To prevent the equipment from flooding, the inlet pipework should be sized to accommodate the volume of condensate generated while the pump is in its discharge cycle. A pipe length and diameter providing a condensate storage volume of 2.1 L will normally be sufficient. It is recommended that the condensate reservoir pipe be positioned at least one pipe diameter below the process outlet while remaining as high as possible above the APT10-4.5 inlet. Install a Spirax Sarco Y-type strainer with 0.8 mm perforations at the APT10-4.5 condensate inlet, as shown in Figure 5.
3.2 Recommended Installation Head
The recommended installation head from the pump base is at least 0.3 m (12 in). The minimum installation head is 0.2 m (8 in), but capacity will be reduced. Note: Hydraulic pulsation may occur at the inlet check valve during cold startup. In this case, installing a throttling valve is recommended to reduce the filling pressure.
3.3 Connections (Refer to Installation Drawing, Figure 4)
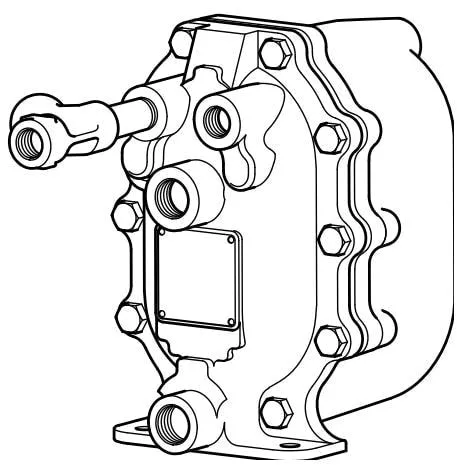
The APT10-4.5 has four connections. The DN20 (3/4”) connection marked (IN) connects to the equipment drain outlet, and the DN20 (3/4”) connection marked (OUT) connects to the condensate return line. Flow arrows indicate the correct flow direction. The DN15 (1/2”) connection marked (S) connects to a properly drained motive steam line. To ensure that this line remains free of condensate, install a Spirax Sarco steam trap and a 100-mesh strainer (see Figure 5). The DN15 (1/2”) connection marked (E) connects through a balance line to the equipment condensate outlet. The balance line should be connected as close as possible to the equipment condensate outlet and to the top of the condensate line, as shown in Figure 5. Note: When securing the APT10-4.5 to a horizontal surface, two 12 mm diameter holes may be drilled through the bottom of the pump cover.
3.4 Outlet Pipework
Correct outlet pipe sizing is essential to prevent excessive back pressure on the APT10-4.5. The flash steam volume generated when the heat exchanger operates at full load must be considered during sizing.
4. Commissioning
- After installing the inlet and outlet pipework and the motive steam/exhaust connections as shown in Figures 4 and 5, slowly open the motive steam inlet valve to supply steam to the APT10-4.5. Ensure that the exhaust/balance line is open and unrestricted.
- Slowly open the isolating valves on the condensate inlet and discharge lines to allow condensate to enter the APT10-4.5 pump body.
- The APT10-4.5 is now ready for operation.
- While the process equipment is operating, the APT10-4.5 will discharge condensate into the return line under all pressure conditions.
- If any abnormal condition is observed, recheck the installation against the recommendations. If the unit still fails to operate, refer to the troubleshooting guide in Section 9.
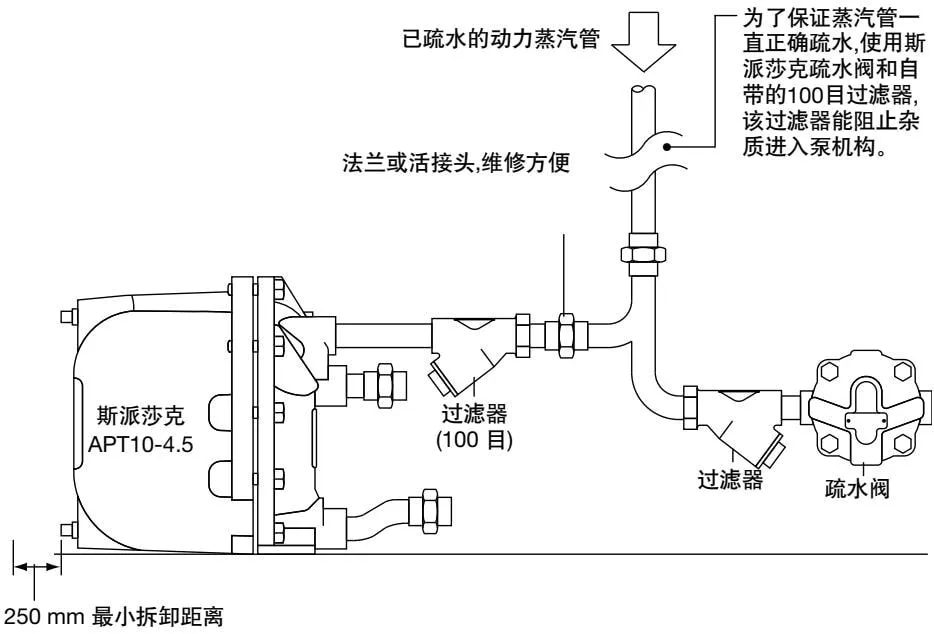
Figure 4 Recommended motive steam and exhaust pipe connections
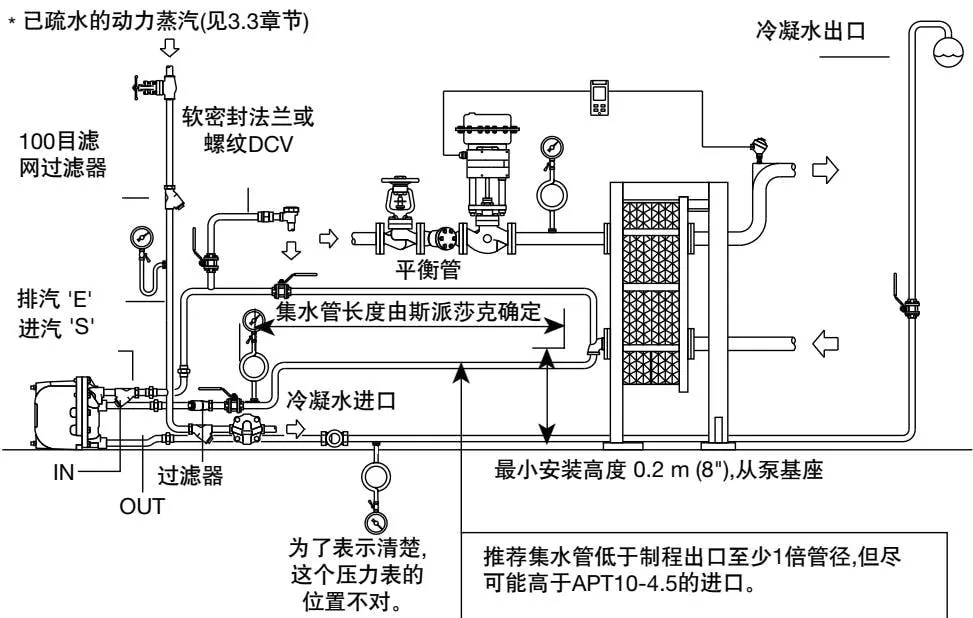
Figure 5
5. Operation
Step 1 (Figure 6)
The APT10-4.5 automatic pump trap operates on the positive displacement principle. Condensate enters the pump body through the swing check valve, causing the float to rise. The float is connected to the steam trap mechanism by a multi-link pivot shaft. When the upstream system pressure PS is sufficient to overcome the backpressure PB (Figure 6), the accumulated condensate is discharged through the open steam trap mechanism.
Under these conditions, the float modulates automatically according to the condensate flow entering the APT10-4.5, controlling the opening and closing of the steam trap.
The illustration shows the larger APT14.
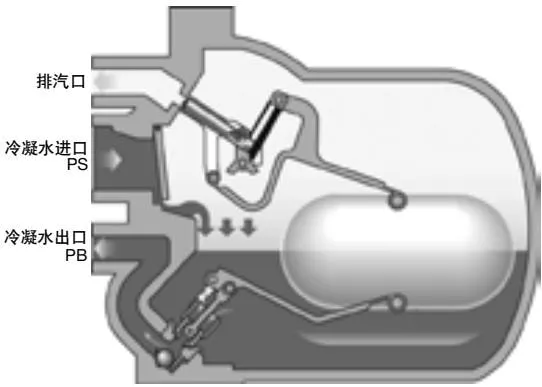
Figure 6
Step 2 (Figure 7)
On some temperature-controlled equipment, the system pressure PS may fall below the backpressure PB (Figure 7). Under these conditions, a conventional steam trap cannot discharge condensate, causing the equipment to become waterlogged.
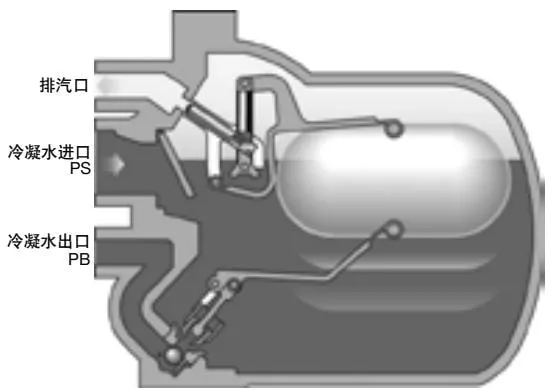
Figure 7
Step 3 (Figure 8)
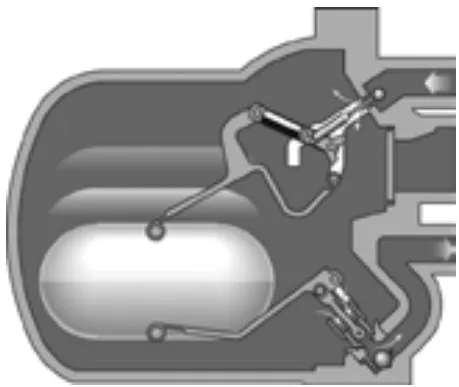
With the APT10-4.5, however, condensate fills the pump body and raises the float until the changeover linkage is actuated, opening the motive steam inlet valve and closing the exhaust valve.
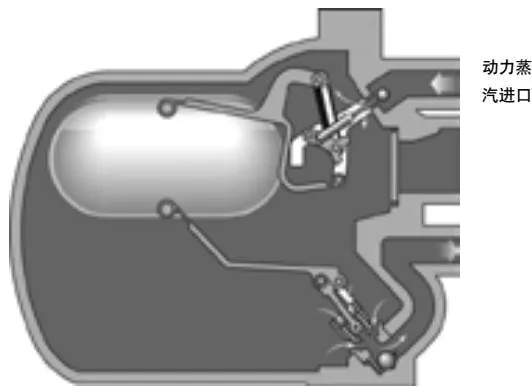
Figure 8
Step 4 (Figure 9)
The snap-action mechanism rapidly changes operation from steam trap mode to powered pump mode. As the motive steam inlet valve opens, the pressure inside the APT10-4.5 rises above the backpressure, forcing condensate through the steam trap seat and into the recovery system.
Motive steam inlet
Figure 9
Step 5 (Figure 10)
As the condensate level in the pump body falls, the float actuates the changeover linkage again, closing the motive steam inlet valve and opening the exhaust valve.
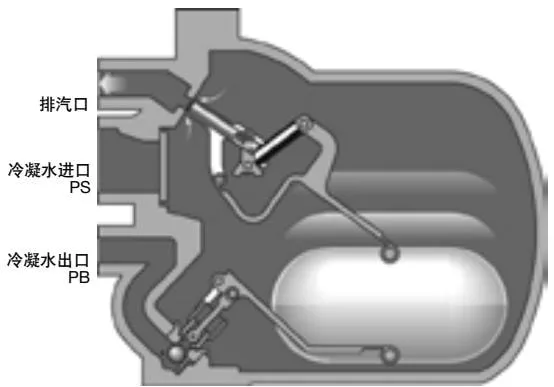
Figure 10
Step 6 (Figure 11)
Opening the exhaust valve equalizes the pressure inside the APT10-4.5 with the condensate inlet pressure, allowing condensate to re-enter through the inlet swing check valve. At the same time, the outlet ball check valve closes to prevent condensate from flowing back into the pump body, and the trapping and pumping cycle begins again.
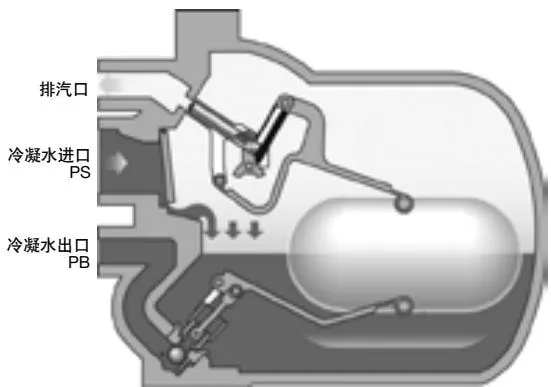
Figure 11
“Return to Step 1”
6. Maintenance
6.1 Inspection and Maintenance of the Mechanism (Important - Safety Notice)
Before carrying out any installation or maintenance work, ensure that all steam and condensate lines are isolated.
Ensure that any residual pressure within the product or connected pipework has been completely relieved and that all hot components have cooled to prevent burns.
Wear suitable protective clothing before carrying out any installation or maintenance work.
Use suitable lifting equipment and ensure that the product is securely supported.
When dismantling this product, exercise caution because of the hazards associated with the snap-action mechanism.
6.2 Removing and Installing the Pump Cover Assembly
Read the safety notice carefully before performing any maintenance on the product.
Tools required:
- 19 mm A/F wrench
- Flat-blade screwdriver
- Torque wrench
6.3 Removing the Pump Cover Assembly
- Disconnect all connections from the pump cover. Remove the pump cover bolts using a 19 mm A/F wrench, then carefully withdraw the pump cover assembly from the pump body. A minimum withdrawal distance of 135 mm is required. Lift the pump cover assembly onto a workbench and secure it safely without contacting the gasket face.
- Inspect the mechanism for obvious damage and for the presence of debris or scale. Check that the float moves freely up and down.
- Inspect the spring assembly for obvious damage. Ensure that the steam inlet valve slides freely and that the spring-loaded exhaust valve moves within its guide.
- Inspect the float for damage and ensure that the linkage pivots freely and has not been damaged by waterlogging.
- Ensure that the inlet swing check valve pivots freely and that the sealing surfaces of the seat and flap are clean and undamaged. If the seat is badly scored or worn, install a new pump cover assembly.
- Inspect the steam trap and ensure that it is free from debris and foreign matter.
- The outlet check valve cannot be inspected without dismantling the steam trap assembly. See Section 8 for the correct procedure for removing and installing this component.
- If any component is damaged or does not operate correctly, refer to Sections 7 and 8 for the correct removal and installation procedures.
6.4 Installing a New Pump Cover Assembly
- Ensure that the pump cover gasket face is clean and free from debris. Carefully place the new pump cover into the existing pump body, ensuring that the new gasket (item 2) is correctly aligned with the sealing face and does not project beyond or recede within the sealing face.
- Reinstall the pump cover bolts and tighten them gradually in a diagonal sequence to a torque of 63 +/- 5 N·m (46.5 +/- 4 lbf·ft).
| Bolt size | Wrench size |
|---|---|
| M12 x 40 | 19 mm A/F |
- Carefully reconnect the motive steam and exhaust lines to the connections marked (S) and (E), respectively. Connect the condensate inlet and outlet to the connections marked (IN) and (OUT), respectively. Then return the APT10-4.5 to operation by following the start-up procedure in Section 4, “Commissioning.”
6.5 Spare Parts
Available spare parts
| Spare part | Location |
|---|---|
| A Pump cover gasket | See page 16 |
| B Inlet check valve | See page 16 |
| C Spring and pushrod | See page 16 |
| D Float | See page 16 |
| E Steam trap and outlet check valve mechanism | See page 16 |
| F Steam inlet/exhaust valve head and seat assembly | See page 16 |
| G Motive steam inlet strainer | See separate documentation |
Note:
- For item numbers, see Figure 3 (page 9).
- To facilitate customer maintenance and ensure that all replacement parts are available, spare parts are supplied as complete kits.
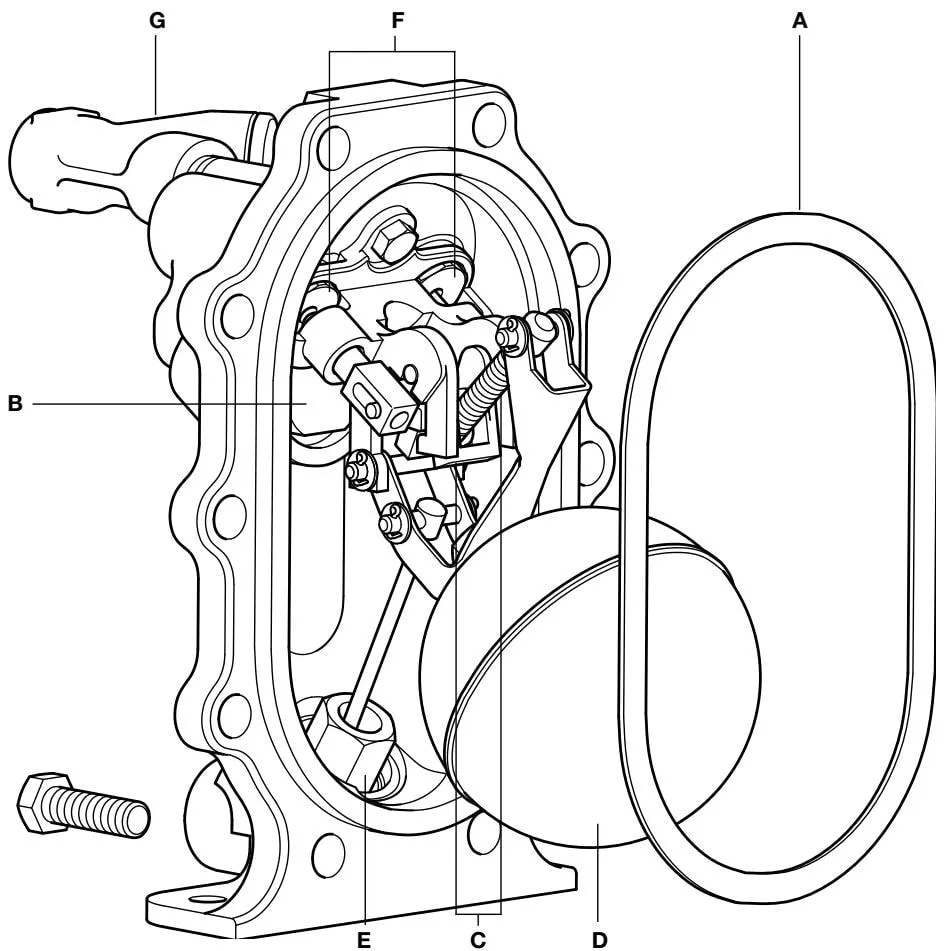
Figure 12 Pump cover assembly
6.6 Spare Parts
Available spare parts
| Spare part | Description | Item numbers |
|---|---|---|
| A | Pump cover gasket | 2 |
| B | Inlet check valve | 2, 12 |
| C | Spring and pushrod | 2, 14, 24 |
| D | Float | 2, 5, 6, 21 |
| E | Steam trap and outlet check valve mechanism | 2, 7, 8, 9, 10, 22, 23 |
| F | Steam inlet/exhaust valve head and seat assembly | 2, 16, 17, 18, 19 |
Note:
- For item numbers, see Figure 3 (page 9).
- To facilitate customer maintenance and ensure that all replacement parts are available, spare parts are supplied as complete kits.

Figure 13 Pump cover assembly
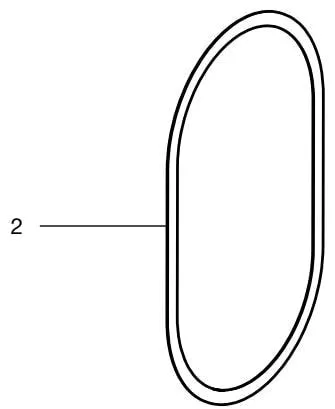
A Pump cover gasket
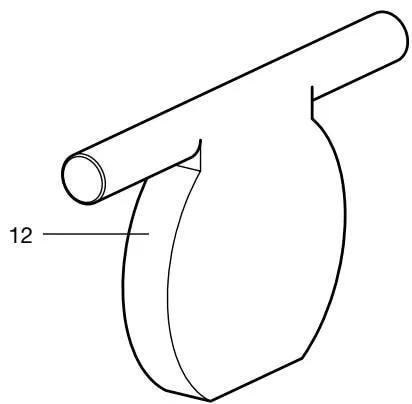
B Inlet check valve
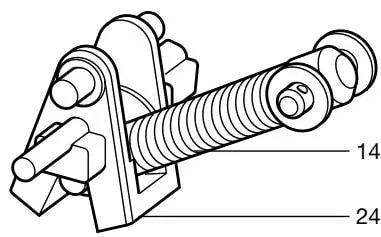
C Spring and pushrod
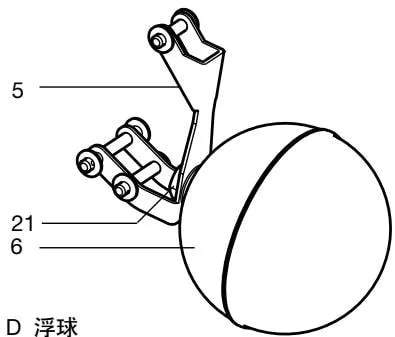
D Float
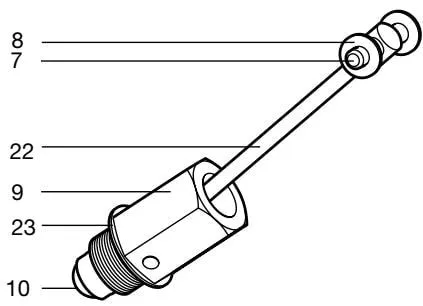
E Steam trap and outlet check valve mechanism

F Steam inlet/exhaust valve head and seat assembly
Figure 14 Spare parts A-F
7. Replacement of Spare Parts (1)
Part 7 covers the replacement of the following spare parts
Pump cover gasket, inlet swing check valve, spring and push rod, and float.
Important - Safety Instructions
Before carrying out any installation or maintenance, ensure that all steam and condensate lines are isolated.
Ensure that any residual pressure in the product or connected pipework has been completely released, and that all hot components have cooled down to prevent burns.
Wear suitable protective clothing before carrying out any installation or maintenance work.
Use suitable lifting equipment and ensure that the product is securely supported.
When removing this product, beware of the hazards associated with the snap-action mechanism and proceed with caution.
7.1 Replacing the Pump Cover Gasket
Read the safety instructions carefully before carrying out any maintenance on the product.
Required tools:
- 19 mm A/F spanner
- Flat-blade screwdriver
- Torque wrench
Fitting a New Pump Cover Gasket
- Disconnect all connections from the pump cover. Remove the pump cover bolts using a 19 mm A/F spanner, then carefully withdraw the pump cover assembly from the pump body. The minimum removal clearance required is 135 mm. Lift the pump cover assembly onto a workbench and secure it safely. Do not touch the gasket surfaces (see Figure 15).
- Carefully remove the old gasket from the pump body and pump cover, taking care not to damage the sealing surfaces.
- Carefully position the new gasket (part 2) on the pump body (see Figure 16).
- Insert the pump cover assembly into the pump body, ensuring that the gasket aligns with the sealing surfaces and is neither recessed below nor protruding above the sealing surfaces.
- Refit the pump cover bolts and tighten them gradually in a diagonal sequence. The tightening torque is 63 ± 5 N·m (46.5 ± 4 lbf·ft).
| Bolt size | Spanner size | Tightening torque |
|---|---|---|
| M12 x 40 | 19 mm A/F | 63 ± 5 N·m (46.5 ± 4 lbf·ft) |
- Carefully reconnect the motive steam pipe and exhaust pipe to the connections marked (S) and (E), respectively. Connect the condensate inlet and outlet to the connections marked (IN) and (OUT), respectively. Then follow the start-up procedure in Part 4, “Commissioning”, to return the APT10-4.5 to operation.