
1. Safety Information
Safe operation of this product can only be guaranteed if it is properly installed, commissioned, and maintained by qualified personnel in compliance with the operating instructions (see Section 1.11). The installation and safety instructions for the pipeline and plant construction must also be observed, together with the proper use of tools and appropriate safety equipment.
1.1 Intended Use
Refer to the Installation and Maintenance Instructions, nameplate, and technical documentation to ensure that the product is suitable for its intended use. The products listed below fully comply with the requirements of the European Pressure Equipment Directive 97/23/EC and can be supplied with the CE mark where required. The products are classified under the Pressure Equipment Directive as follows:
| Product | Group 1 Gases | Group 2 Gases | Group 1 Liquids | Group 2 Liquids | |
| M21Si ISO and M21Vi ISO | DN15 - DN25 | SEP | SEP | SEP | SEP |
| DN32 | 2 | SEP | SEP | SEP | |
| DN40 - DN50 | 2 | 1 | SEP | SEP | |
| DN65 - DN100 | 2 | 1 | 2 | SEP | |
| DN150 | 3 | 2 | 2 | SEP | |
i) This product is designed for use with steam, compressed air, water, and other industrial fluids classified as Group 2 fluids under the Pressure Equipment Directive. It may also be used with methane, propane, oxygen, and hydrocarbons classified as Group 1 fluids under the Pressure Equipment Directive. Consult Spirax Sarco regarding use with other fluids.
ii) Ensure that the product materials are suitable for the operating conditions and that the maximum and minimum system pressures and temperatures are within the product’s design limits. If the product’s maximum operating limits are lower than the system operating conditions, or if product failure could result in hazardous overpressure or excessive temperature, install an appropriate safety device.
iii) Ensure that the product is installed correctly and that the inlet and outlet are not reversed.
iv) Spirax Sarco products are not designed to withstand external loads. The installer must prevent external forces in the system from being imposed on the product.
v) Before installation, remove the protective covers from all product connections.
1.2 Access
After installation, ensure that there is sufficient space to operate the product. Where required, prepare a safe working platform before operating the product. Provide suitable lifting equipment where necessary.
1.3 Lighting
Ensure adequate lighting, particularly where detailed or complex work is required.
1.4 Hazardous Liquids or Gases in the Pipeline
Consider in advance what fluids are present, or may previously have been present, in the pipeline. Pay particular attention to flammable substances, substances hazardous to health, and fluids at extreme temperatures.
1.5 Hazardous Working Environment
Consider explosion hazards, oxygen deficiency (for example, inside tanks or in low-lying areas), hazardous gases, extreme temperatures, hot surfaces, fire hazards (for example, during welding), excessive noise, and moving machinery.
1.6 The System
Understand the operation of the complete system. Before performing any operation, such as closing isolation valves or switching electrical equipment, consider whether it could place any other part of the system or any personnel at risk.
Hazards may include isolation of vents or protective devices and the disabling of controls or alarms. Open and close isolation valves slowly to prevent system shock.
1.7 Pressure Systems
Ensure that the system is isolated from pressure or completely drained. Consider double isolation and locking or labeling closed valves. Never assume that the system has been completely depressurized merely because a pressure gauge reads zero.
1.8 Temperature
After isolation, allow the product to cool to ambient temperature to prevent burns.
1.9 Tools and Spare Parts
Before starting work, ensure that suitable tools and spare parts are available. Use only genuine Spirax Sarco spare parts.
1.10 Protective Clothing
Consider whether operators or nearby personnel require protective clothing to guard against hazards such as chemicals, extreme temperatures, radiation, noise, falling objects, and injury to the eyes or face.
1.11 Permit to Work
All work must be performed or supervised by suitably competent personnel. Installation and operating personnel must be trained in accordance with the product’s Installation and Maintenance Instructions to ensure correct use of the product.
Where a permit-to-work system is in force, it must be observed. Where no such system is in force, the responsible person must understand the nature of the work and, where necessary, appoint an assistant with specific responsibility for safety.
Post warning notices where necessary.
1.12 Handling
Manual handling of large or heavy products may present a risk of injury. Lifting, pushing, pulling, carrying, or supporting a load using bodily force can cause injury, particularly to the back. Assess the task, the individual, the load, and the working environment, and use handling methods appropriate to the site conditions.
1.13 Residual Heat
During normal operation, the external surface of this product may become very hot. When used at the maximum permissible operating temperature, the product surface temperature may reach:
- M21Si: 260°C (500°F)
- M21Vi: 230°C (446°F)
This product is not self-draining. Exercise caution when removing or relocating it from its installed position (refer to the “Maintenance Instructions”).
1.14 Freezing
Non-self-draining products used where the ambient temperature may fall below freezing must be protected against frost damage.
1.15 Safety Information - Product-Specific Information
Hydraulic Locking
When a ball valve is used in hot or cold applications involving both steam and water, it may be susceptible to hydraulic locking. During valve closure, water trapped inside the ball is heated, creating high hydraulic pressure within the ball. To prevent hydraulic locking, a small hole is drilled in the ball during manufacture so that pressure can be relieved after the valve is closed. Certain Spirax Sarco ball valves are clearly marked with the correct installation orientation so that the hole faces the steam side when the valve is closed.
1.16 Disposal
Unless otherwise stated in the Installation and Maintenance Instructions, this product is recyclable and presents no ecological hazard when disposed of with due care.
1.17 Returning Products
Under EC health, safety, and environmental legislation, customers and distributors returning products must provide information about any hazards and the precautions to be taken regarding residual contamination or mechanical damage that could present a health, safety, or environmental risk. This information must be provided in writing and must include health and safety data sheets identifying any known or potential hazards.
2. Product Information
2.1 Introduction
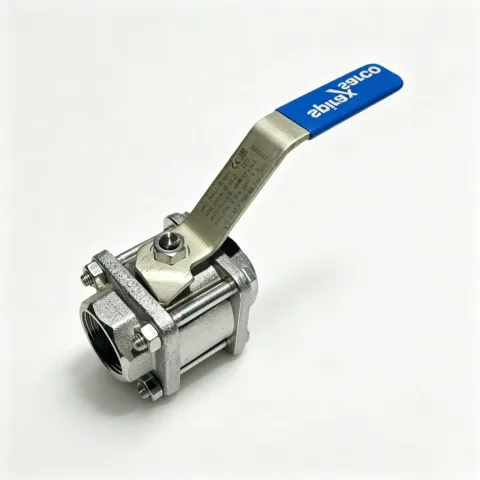
M21Si and M21Vi are reduced-bore ball valves with a one-piece design and standard ISO mounting. They are intended for isolation service only and can be used with most industrial media. They must not be used as control valves.
ISO Mounting
The integral ISO valve body enables automatic actuation without removing the valve, thereby maintaining sealing integrity. Spirax Sarco ISO series ball valves can be easily configured for manual or remote operation.
Available Models
| M21Si2 ISO | Galvanised carbon steel body, PDR 0.8 seats |
| M21Si3 ISO | Stainless steel body, PDR 0.8 seats |
| M21Vi2 ISO | Galvanised carbon steel body, PTFE seats |
| M21Vi3 ISO | Stainless steel body, PTFE seats |
Standards
This product fully complies with the European Pressure Equipment Directive 97/23/EC. CE marking is available upon request.
Certification
An EN 10204 3.1 certificate is available for this product.
Note: Please specify this requirement when ordering.
Note: For further information, refer to technical information sheet TI-P133-77.
2.2 Sizes and Pipe Connections
DN15, DN20, DN25, DN32, DN40, DN50, DN65, DN80, DN100 and DN150
Standard flanges: EN 1092 PN40
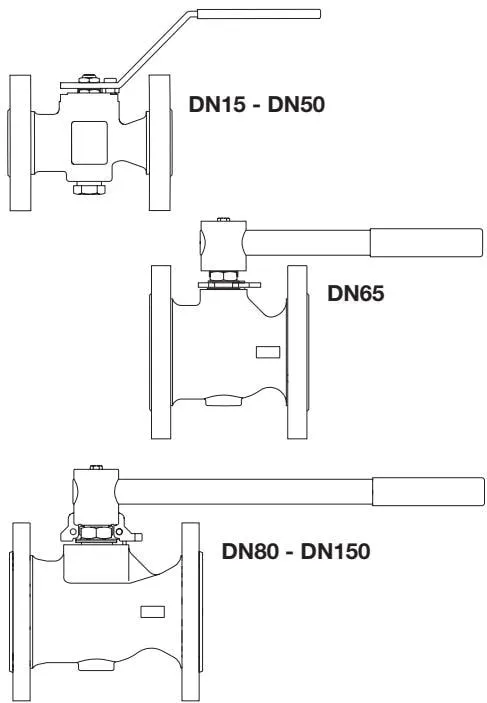
Face-to-face Dimensions:
- DN15 to DN100: face-to-face dimensions in accordance with DIN3202 F4
- DN25 to DN150: face-to-face dimensions in accordance with BS 2080.
2.3 Pressure/Temperature Limits
M21Si2 ISO and M21Si3 ISO ball valves with PDR 0.8 seats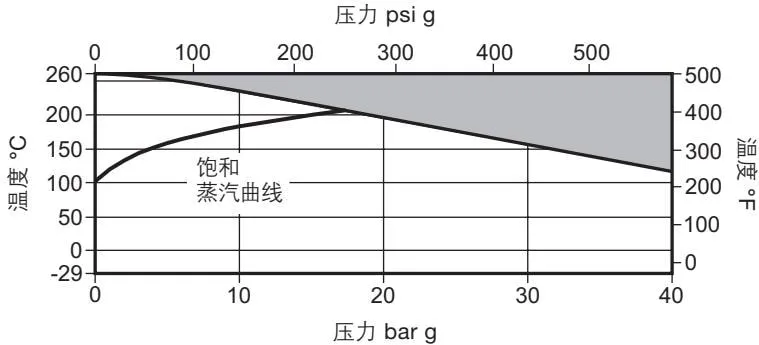
M21Vi2 ISO and M21Vi3 ISO ball valves with PTFE seats

This product must not be used in this area
| Body design conditions | PN40 | |||
| PMA | Maximum allowable pressure | 40 bar g @ 120°C | (580 psi g @ 248°F) | |
| TMA | Maximum allowable temperature | M21Si | 260°C @ 0 bar g | (500°F @ 0 psi g) |
| M21Vi | 230°C @ 0 bar g | (446°F @ 0 psi g) | ||
| Minimum allowable temperature | -29°C | (-20°F) | ||
| PMO | Maximum operating pressure for saturated steam service | M21Si | 17.5 bar g | (254 psi g) |
| M21Vi | 10.0 bar g | (145 psi g) | ||
| TMO | Maximum operating temperature | M21Si | 260°C @ 0 bar g | (500°F @ 0 psi g) |
| M21Vi | 230°C @ 0 bar g | (446°F @ 0 psi g) | ||
| Minimum operating temperature. Note: Consult Spirax Sarco for lower operating temperatures. | -29°C | (-20°F) | ||
| ΔPMX | Maximum operating differential pressure is the same as PMO | |||
| Maximum design cold hydraulic test pressure: | 60 bar g | (870 psi g) | ||
3. Installation
Note: Before installation, read Section 1, “Safety Information”.
Although the valve has a robust design, stresses caused by poor pipe alignment and/or incorrect pipe length can adversely affect the valve and must be avoided. Particular attention must be paid to correct pipe alignment, ensuring that the pipe and valve are on the same axis.
The valve is intended for on/off applications and can be operated manually.
Allow sufficient clearance when installing the valve to facilitate operation and maintenance.
Before installing the valve, ensure that the size, pressure rating, materials, connection type and other specifications are suitable for the application.
Before installation, remove any contaminants that may have accumulated in the ball valve during storage. Keep the valve clean during installation, as contaminants can damage the valve seats and operating mechanism.
To reduce seat wear caused by coarse particles, install a strainer upstream of the ball valve.
Ensure that the handle is positioned correctly during installation. Ideally, the stem should be vertical. When used with gases, the ball valve may be installed in any position; see Figure 3 below.
When used with steam:
- Install a drain point upstream of the ball valve.
- Open the ball valve slowly to prevent water hammer.
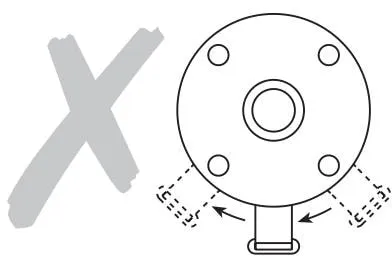
When used with liquids, do not install the valve upside down (Figure 2).
Figure 2 Incorrect installation arrangement for liquids
Note: Always open the valve slowly to prevent system shock.
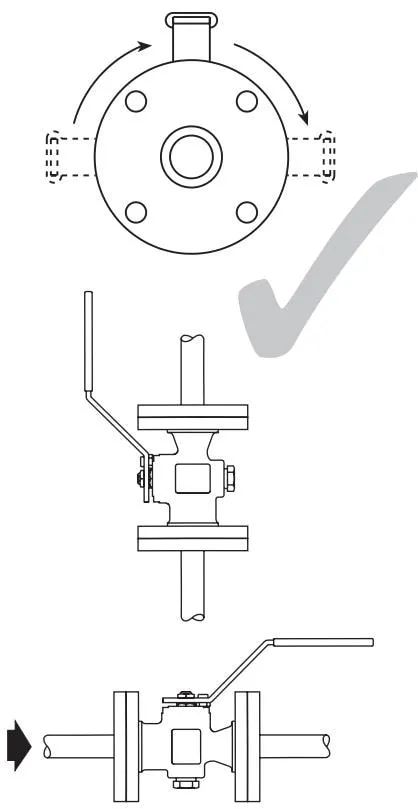
Figure 3 Correct installation arrangement for gases
4. Commissioning
After installation or maintenance, ensure that the system is operating correctly and test any alarm or protective devices.
5. Operation
The ball valve is operated manually using the handle. Ensure that the handle is operated in the correct direction.
It is intended for on/off service and may be either fully open or fully closed.
6. Maintenance
Note: Before carrying out any maintenance work, read Section 1, “Safety Information”.
6.1 General
For all mechanical equipment, regular maintenance is the most effective means of ensuring continued operating efficiency.
Regular maintenance of all equipment is essential, even for valves that are only used occasionally.
6.2 Introduction
Remove the valve from the pipeline. The body assembly can then be replaced with a new one. Note: The body insert (2) can only be removed using a special tool supplied by Spirax Sarco. See Section 7, Available Spare Parts. After replacing the seats and reassembling the valve, it is recommended that the following tests be carried out before commissioning at the installation site:
- Cold hydraulic test at 60 barg (870 psi g).
- Seat leakage test using compressed air at 7 barg.
6.3 Replacing the Seats (5):
- Remove the body as described in Section 6.2.
- Once the body has been removed, remove the seats (5) and O-rings (6).
- Fit the new seats (5) into their corresponding positions in the body.
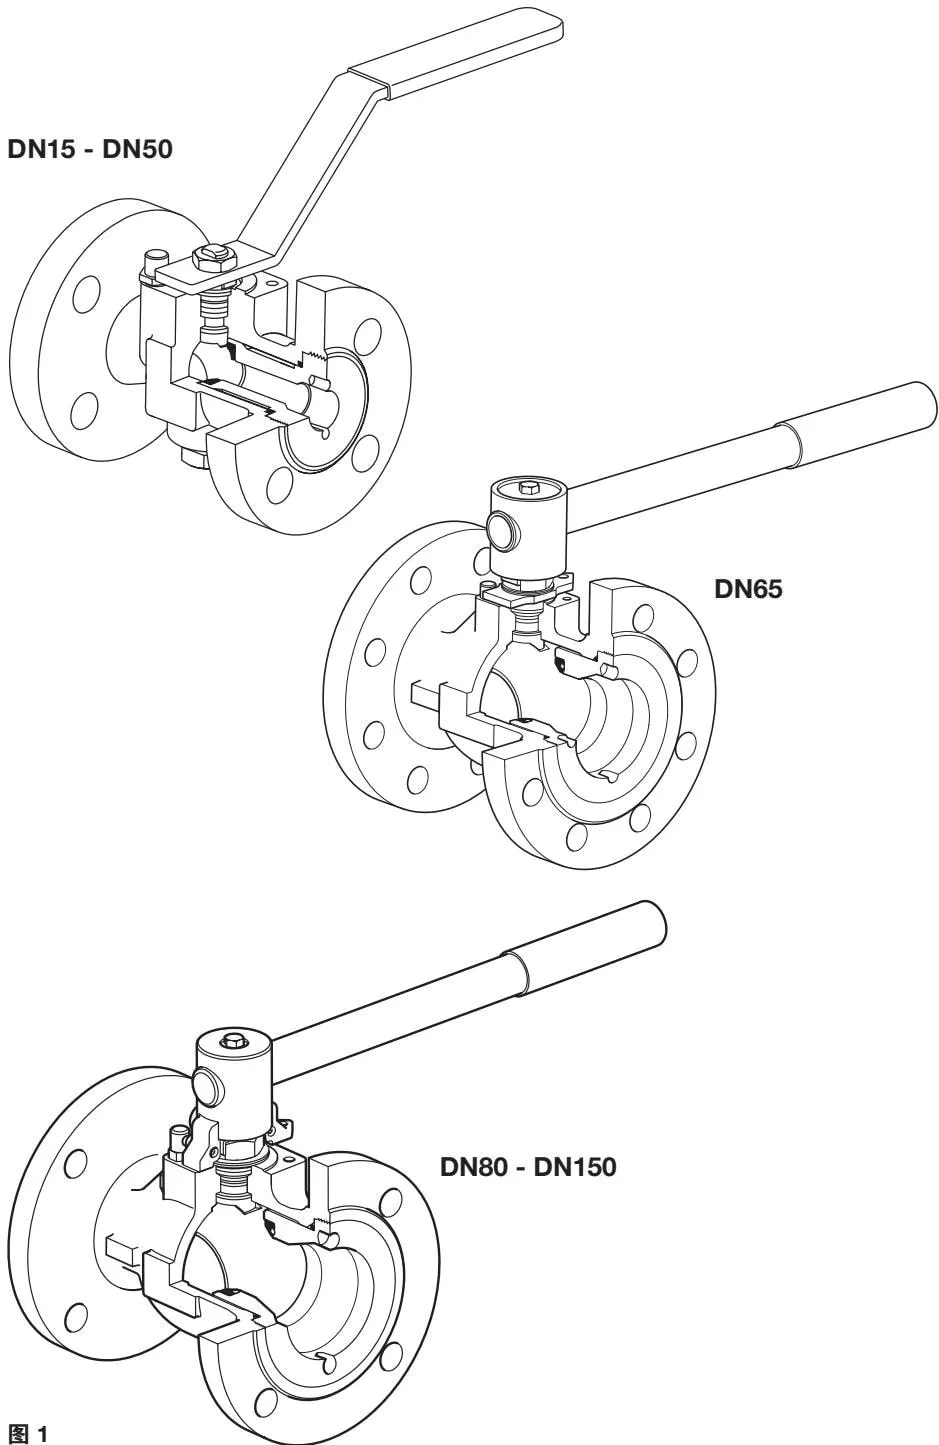
- Refit the ball valve insert (2) using a new O-ring (6), and tighten the valve; see Figure 1.
6.4 Replacing the Stem Seals:
- Remove the body as described in Section 6.2.
- Remove the nuts (15 and 16).
- Replace the stem seals (9 and 10).
- Refit the ball valve insert (2) using a new O-ring (6), and tighten the valve to the recommended torque; see Figure 1.
6.5 Reassembly
Reassemble in the reverse order of the steps described above. Tighten the bolts and nuts (15, 16) to the recommended torque; see Table 1.
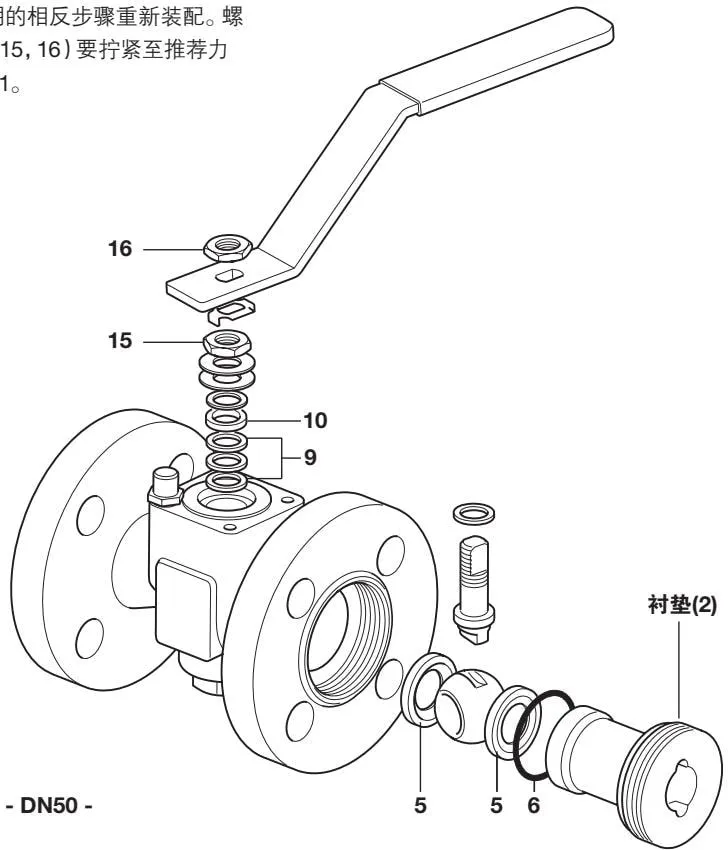
Figure 4 DN15 - DN50
7. Spare Parts
Spare Parts for DN15 to DN50
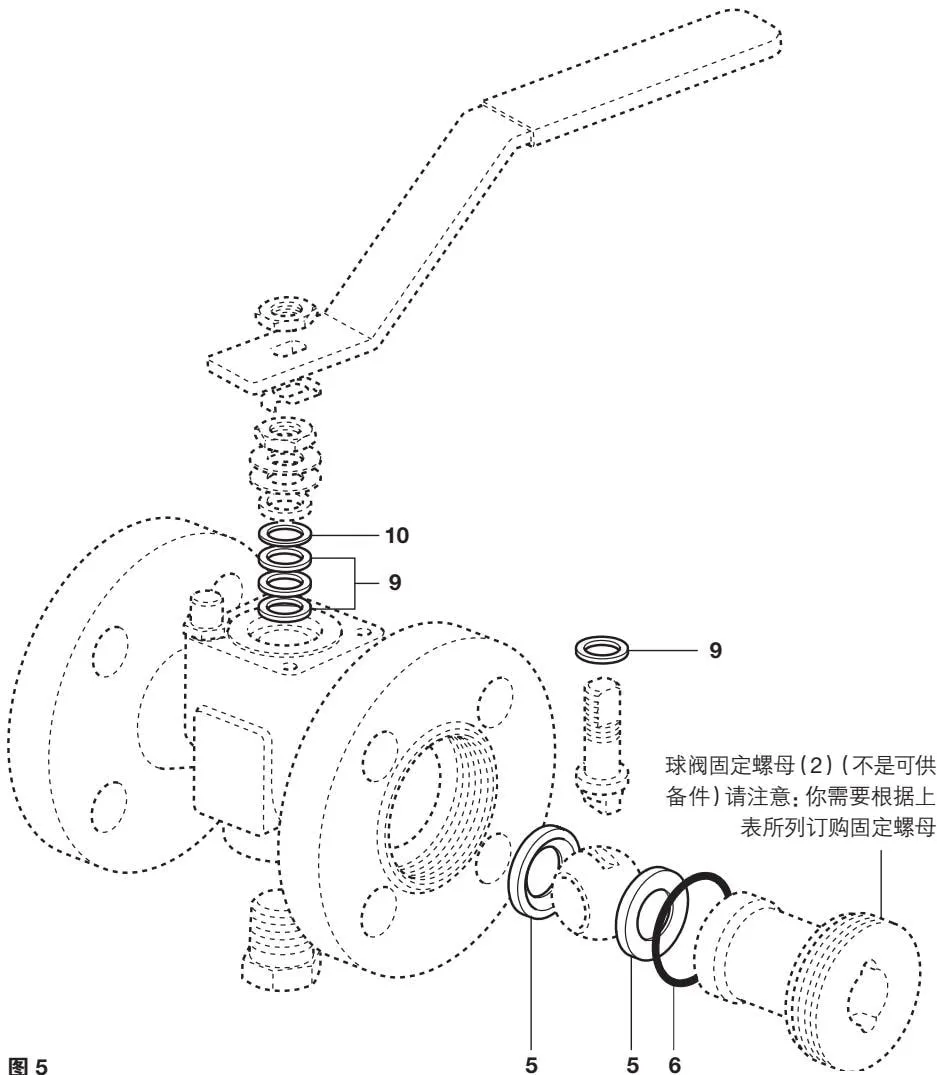
Solid lines indicate available spare parts; broken lines indicate parts that are not supplied as spares.
Available Spare Parts
| Seat, stem seal and body gasket set | 5,6,9,10 |
| Insert tool - special tool for removing the ball valve insert (2) | Not shown |
How to Order
Order spare parts according to the description in the “Available Spare Parts” column, specifying the ball valve size and model.
Example 1: Seat, insert O-ring and stem seal set for a Spirax Sarco DN50 flanged PN40 M21Si2 ball valve.
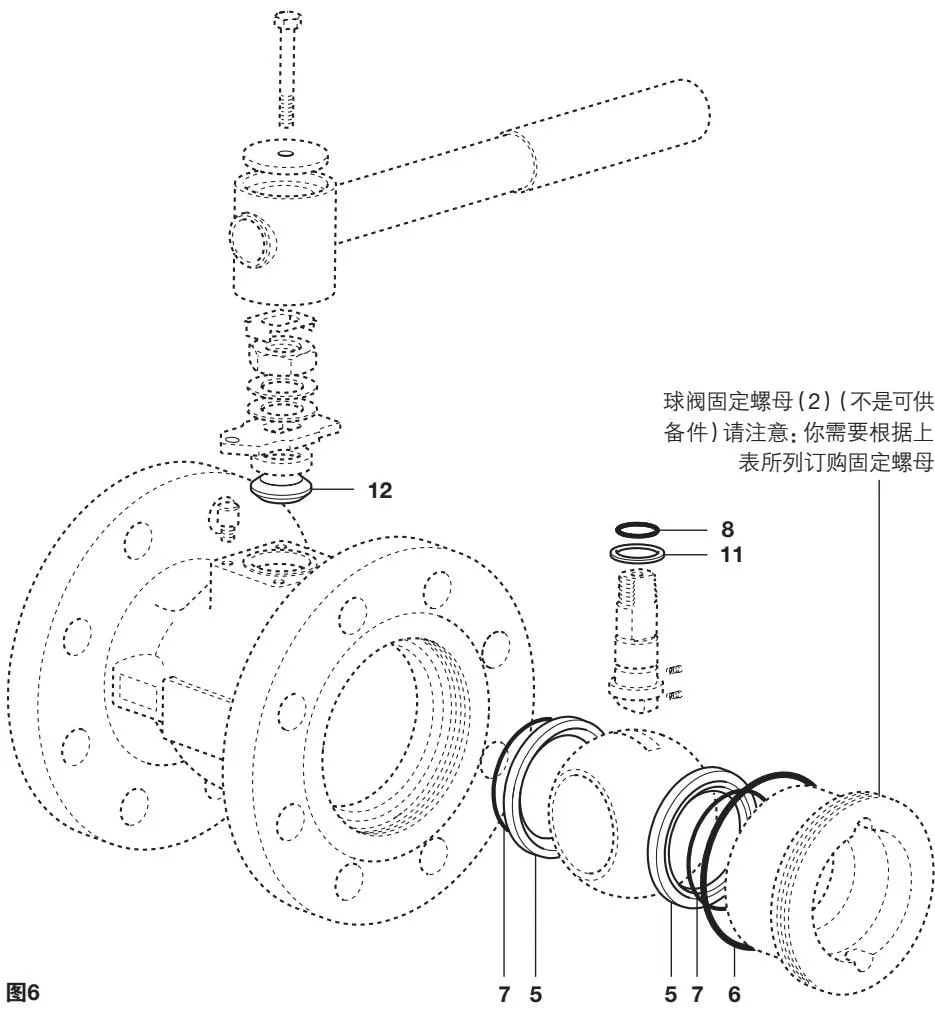
Spare Parts for DN65 to DN150
Solid lines indicate available spare parts; broken lines indicate parts that are not supplied as spares.
Available Spare Parts
Seat, stem seal and body gasket set
5, 6, 7, 8, 11, 12
Insert tool - special tool for removing the ball valve insert (2)
Not shown
How to Order
Order spare parts according to the description in the “Available Spare Parts” section, specifying the ball valve size and model.
Example 1: Seat, stem seal and body gasket set for a Spirax Sarco DN50 flanged PN40 M21Si2 ball valve.